
Hand Dryer Installation Mistakes to Avoid
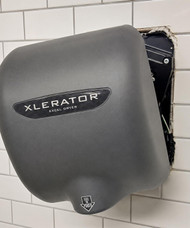
Installing a commercial hand dryer seems straightforward, but small decisions during installation can affect how well the unit performs every day. Placement, clearance, electrical requirements, mounting, and maintenance access all play a role in whether the dryer works reliably in a busy restroom.
The most common mistakes usually happen when the installation is treated as a quick wall-mounted equipment job instead of part of the overall restroom setup. A hand dryer needs to fit the space, support the flow of traffic, stay easy to service, and match the facility’s electrical and usage needs.
Planning these details before installation helps prevent avoidable complaints, service calls, and replacement costs. This guide covers the hand dryer installation mistakes facility teams should watch for, along with practical ways to avoid them.
Choosing the Wrong Location
Location is one of the biggest factors in how well a commercial hand dryer performs after installation. A dryer needs more than an open section of wall. It needs the right amount of clearance, a clear sensor path, proper airflow, and enough room for cleaning and service.
Poor placement can create issues that are easy to avoid with a little planning. Before the unit is mounted, look at how people move through the restroom, where water is likely to drip, what surfaces sit near the dryer, and how maintenance staff will access the unit later.
Keep the Sensor Area Clear
Touchless hand dryers depend on sensors to know when to start and stop. If the dryer is mounted too close to a sink, counter, partition, trash receptacle, or reflective surface, the sensor may not read hand placement correctly.
That can lead to frustrating performance. The dryer may activate when no one is using it, run longer than expected, or fail to respond consistently. In tight restrooms, even a small placement issue can affect how the sensor performs.
To avoid this mistake, review the manufacturer’s recommended sensor clearance before installation. The space directly below and around the dryer should remain open enough for the sensor to detect hands rather than nearby fixtures.
Protect Airflow Around the Unit
A commercial hand dryer needs clear airflow to dry hands efficiently. When the intake or outlet area is crowded by walls, counters, partitions, or restroom accessories, the unit may not move air the way it was designed to.
Restricted airflow can reduce drying performance and create more wear on the dryer over time. This matters even more for high-speed models and dryers with filters, since they rely on steady air movement to perform well.
Before mounting the dryer, check what sits around the unit from every side. Leave enough clearance for air to move freely and make sure future additions, such as trash cans or wall-mounted dispensers, will not block the dryer’s intake or outlet.
Leave Room for Maintenance
A hand dryer should be easy to service once it is installed. Maintenance teams may need to remove the cover, clean the sensor, change a filter, adjust settings, or access internal parts.
If the dryer is installed too close to a partition, vanity, corner, or other restroom accessory, routine service can become harder than it needs to be. Over time, that can lead to skipped maintenance, weaker performance, and avoidable service calls.
Plan for maintenance access before the dryer goes on the wall. Make sure staff can reach the parts they need without removing nearby fixtures or working in a cramped space.
Avoid Impact Zones
Commercial restrooms see constant movement from users, cleaning crews, carts, trash receptacles, and doors. A dryer installed in a tight path or near a door swing can get bumped repeatedly.
Those impacts can loosen the mounting, damage the cover, or shift the unit out of alignment. In high-traffic spaces like schools, warehouses, public buildings, and busy offices, placement should account for daily use and cleaning routines.
Choose a location that keeps the dryer easy to reach without putting it in the path of doors, equipment, or heavy foot traffic.
Ignoring the Restroom Layout
A good hand dryer location has to work with the full restroom layout, not just the wall around the unit. The dryer should fit naturally into the handwashing process, support traffic flow, and stay accessible for the people using the restroom.
When layout is ignored, small issues can become daily frustrations. Users may drip water across the floor, block sinks or doorways while drying their hands, or have trouble reaching the dryer comfortably. These problems are especially common in compact restrooms and high-traffic facilities where every fixture affects movement.
Placing the Dryer Too Far From the Sink
The dryer should be close enough to the sink area that users can move from washing to drying without crossing the restroom with wet hands. If the dryer is too far away, water can drip across the floor and create more work for cleaning teams.
This does not mean the dryer should be crowded against the sink or counter. The goal is to place it near the natural handwashing path while still protecting the sensor area, airflow, and maintenance access.
Creating Traffic Bottlenecks
In busy restrooms, dryer placement can affect how people move through the space. If the dryer is installed too close to a doorway, stall entrance, sink, or narrow walkway, users may block others while drying their hands.
This matters in schools, offices, warehouses, healthcare facilities, and public buildings where restroom traffic comes in waves. Before installation, think about where people will stand while using the dryer and what they may block during peak use.
For larger or higher-traffic restrooms, one dryer may not be enough. Adding another unit or choosing a faster drying model can help keep traffic moving and reduce crowding around the sink area.
Missing Accessibility Considerations
Accessibility should be part of the installation plan from the start. A hand dryer needs to be reachable, usable, and placed where it does not create a barrier in the restroom path.
Mounting height matters, but it is not the only factor. Clear floor space, reach range, and how far the dryer projects from the wall can all affect accessibility. In narrow spaces, a recessed or lower-profile model may be a better fit than a bulky surface-mounted unit.
Always review applicable ADA requirements before installation. Planning for accessibility early helps avoid costly changes after the dryer is already mounted.
Overlooking Electrical Requirements
Electrical requirements should be confirmed before a commercial hand dryer is ordered or installed. Not every dryer uses the same voltage or draws the same level of power (watts), and a replacement unit may not match the wiring used by the old model.
Before purchasing, check the voltage, amperage, and circuit requirements against the power available at the installation location. This is especially important for high-speed dryers, multi-unit restrooms, and replacement projects where teams may assume the existing setup will work.
A quick review with the installer or electrician can prevent delays, product exchanges, poor performance, or electrical issues after installation. For facilities managing multiple buildings, confirming these details upfront also makes it easier to standardize dryers without creating compatibility problems from one location to the next.
Using the Wrong Mounting Approach
A commercial hand dryer needs a secure mounting surface and the right hardware. These units see frequent use, regular cleaning, and vibration from high-speed airflow, so a weak installation can lead to rattling, movement, noise, or even present a physical hazard over time.
Before installation, check the wall surface, mounting instructions, and any backing or fastener requirements. The dryer should sit level, flush (or recessed), and firmly anchored.
Mounting to a Weak or Unprepared Surface
Tile, drywall, concrete block, masonry, and restroom partitions may all require different mounting methods. If the wall is weak, uneven, or not properly prepared, the dryer may loosen or shift with regular use.
Confirm the wall can support the unit before mounting. Use hardware suited to the surface and do not rely on old anchors from a previous dryer unless they are appropriate for the new model.
Not Accounting for Vibration and Noise
Some dryer noise comes from the model itself, but poor mounting can make it worse. Loose covers, weak anchors, or uneven contact with the wall can create rattling or vibration.
After installation, run the dryer and listen for anything that sounds loose or unstable. It is better to correct those issues during installation than leave users and maintenance teams to deal with them later.
Don't Skip Final Testing After Installation
Final testing helps catch installation-related issues before the restroom goes back into regular use. A quick power check is not enough. The dryer should be tested the way people will actually use it, with the cover fully installed and the surrounding restroom setup in place.
This step is especially important for touchless dryers, high-speed models, and units with adjustable settings. Small issues with sensor range, airflow, cover fit, or mounting can usually be corrected quickly during installation.
Test the Sensor Under Real Conditions
The sensor should activate when hands are placed in the correct drying area and stop when they are removed. If the dryer starts too early, runs too long, or does not respond consistently, the sensor range or surrounding placement may need to be adjusted.
Test the dryer with nearby fixtures, counters, partitions, trash cans, and lighting in place. These details can affect how the sensor performs once the restroom is in normal use.
Check Airflow, Heat, and Noise
Run the dryer long enough to confirm that airflow feels strong and unobstructed. If the model includes heat or speed settings, make sure they are set appropriately for the facility.
Listen for rattling, scraping, buzzing, or vibration. These sounds may point to loose hardware, a misaligned cover, blocked airflow, or an unstable mounting surface.
Confirm Maintenance Access Before Closing the Job
Before the installation is complete, make sure maintenance teams can reach the parts they will need later. That may include filters, covers, sensors, switches, drain areas, or cleaning points depending on the model.
This is also the right time to keep the installation manual, warranty details, and model information on file. Those details make future maintenance, troubleshooting, and replacement planning much easier.
Work With Berl’s Commercial Supply Before Installation
Avoiding hand dryer installation mistakes starts with choosing the right unit for the space. Location, traffic level, electrical requirements, mounting surface, sensor clearance, and maintenance access all affect how well the dryer performs once the restroom is in use.
Berl’s Commercial Supply helps facilities find commercial hand dryers that fit their restroom layout and day-to-day demands. From high-speed models for busy restrooms to touchless and filtered options for facilities with specific hygiene or maintenance needs, to recessed units, our team can help you compare the right options before installation begins.
Browse our comprehensive selection of commercial hand dryers or contact Berl’s Commercial Supply for help selecting the right model for your facility.